
 Latest images
Another Shroudy Day **UPDATED 04/04/2013**
+6
CatMostFeared
Solscud007
AZ2000
Jedi380
mambro
RubbaDubbaBubba
10 posters
Page 1 of 1
![]()
 Another Shroudy Day **UPDATED 04/04/2013**
![]() by RubbaDubbaBubba Sun Mar 31, 2013 2:09 am
by RubbaDubbaBubba Sun Mar 31, 2013 2:09 am
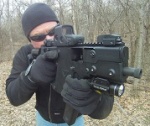
Venting my Barrel Shroud
Well, this will be my fourth thing to post. I hope that they're useful.
Went shooting and as usual the barrel shroud gets hot and stays warm for a while. I'd would like to purchase a vented shroud but, two things stand in my way.
1. The high cost of the shroud.
2. Can't buy something when you got nothing.
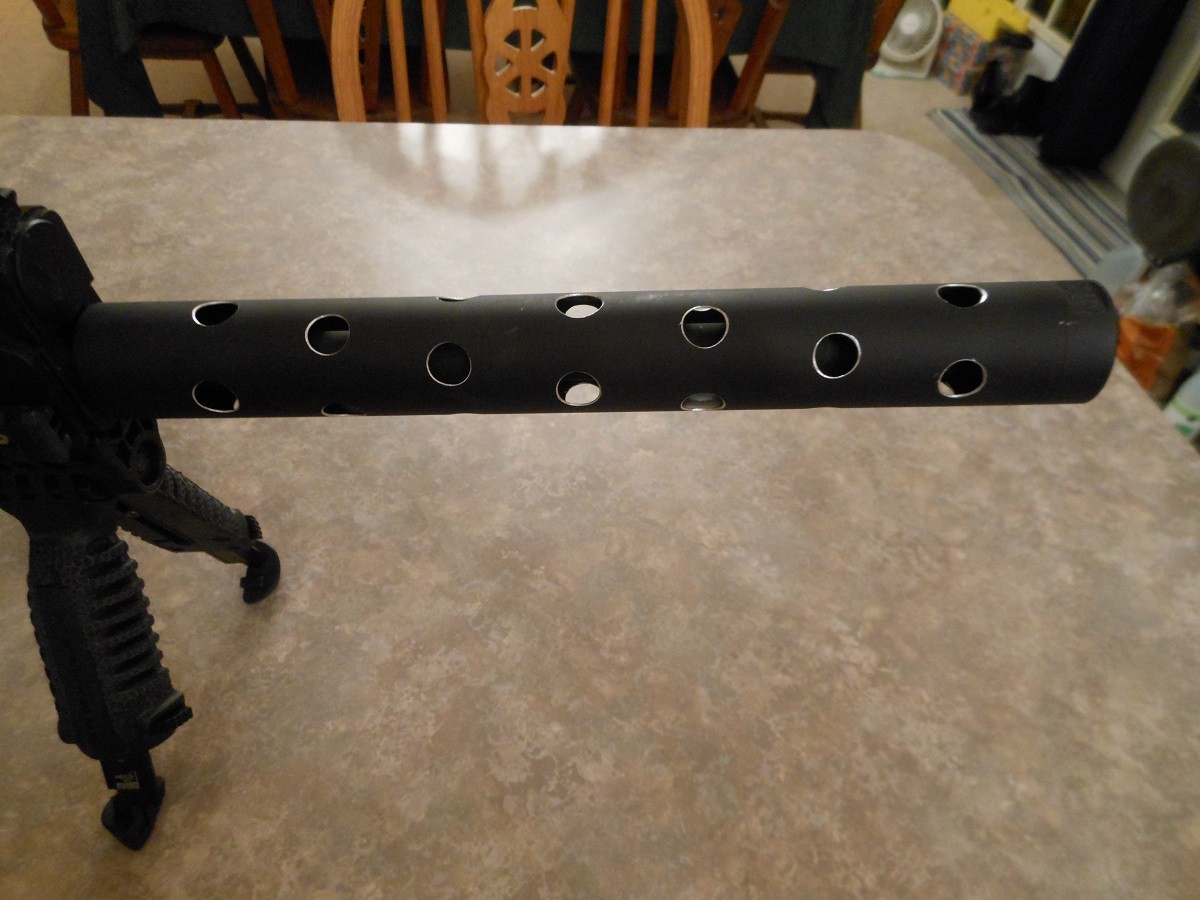
So, I'll do then next best thing and hope I don't screw it up. So I thought, do I want a plain Jane straight drilled tube? Nah, why be normal. I decided to do a four rows, seven holes per row and added a spiral turn for effect.
So if your interested, let's get going.
Tools:
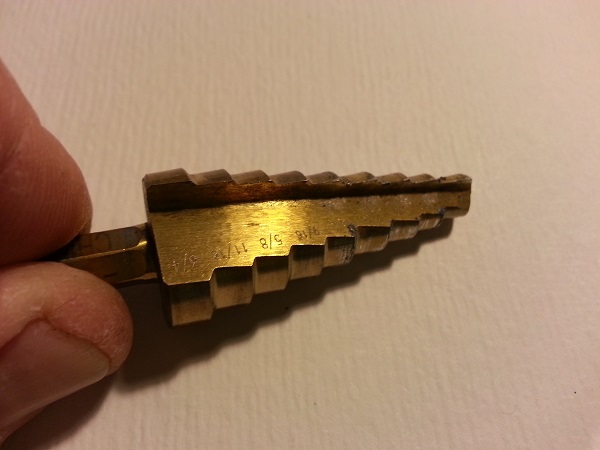
- (1) 3/16" drill bit
- (1) 1/4"-3/4" Step drill bit - Harbor Freight Item #44460 - makes a cleaner hole that a large bit does.
- (1) Drill press or (1) Hand drill complete with a steady hand
- (1) Metric ruler. paper and markers
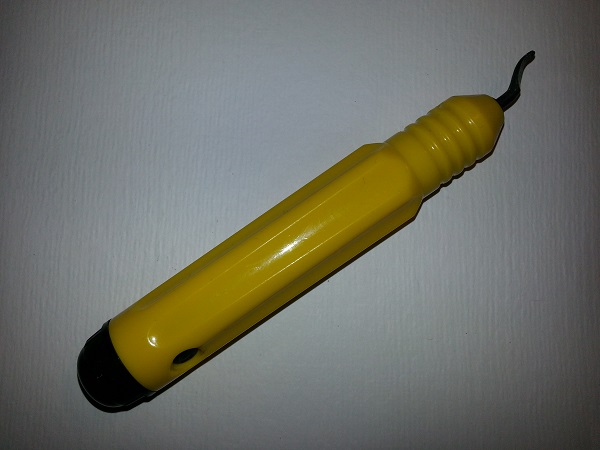
- (1) Debur tool - General Instruments #481 about $9.00 comes in handy for a lot of projects
- Scotch tape
- Jig to hold shroud - Notch a "V" into (2) 2"X4"'s X6" to use as a stand to hold shroud steady while drilling.
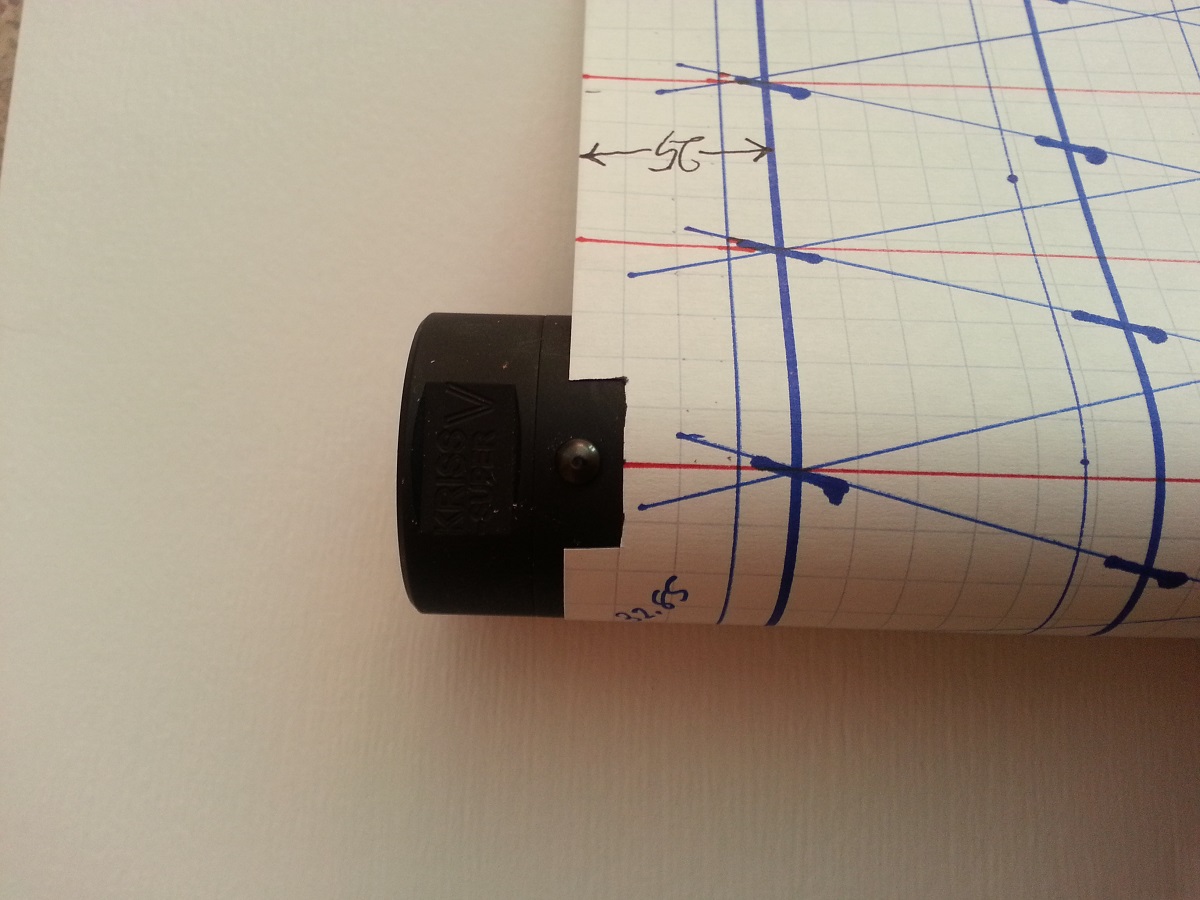
OK, my shroud is 120mm in circumference and is 315mm long. I lined out a grid on paper and cut to use as a template to wrap around my shroud. This will give me my locations to drill the holes for venting the shroud.
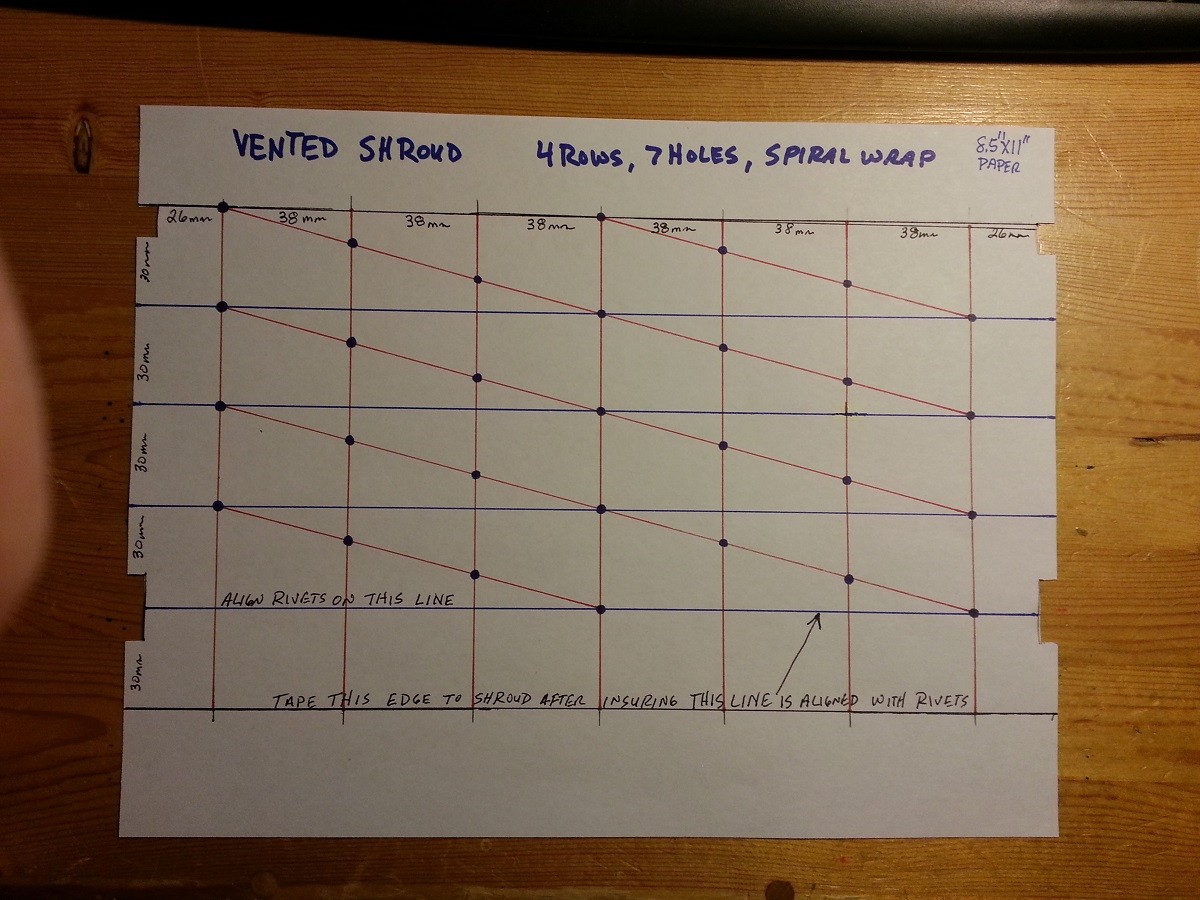
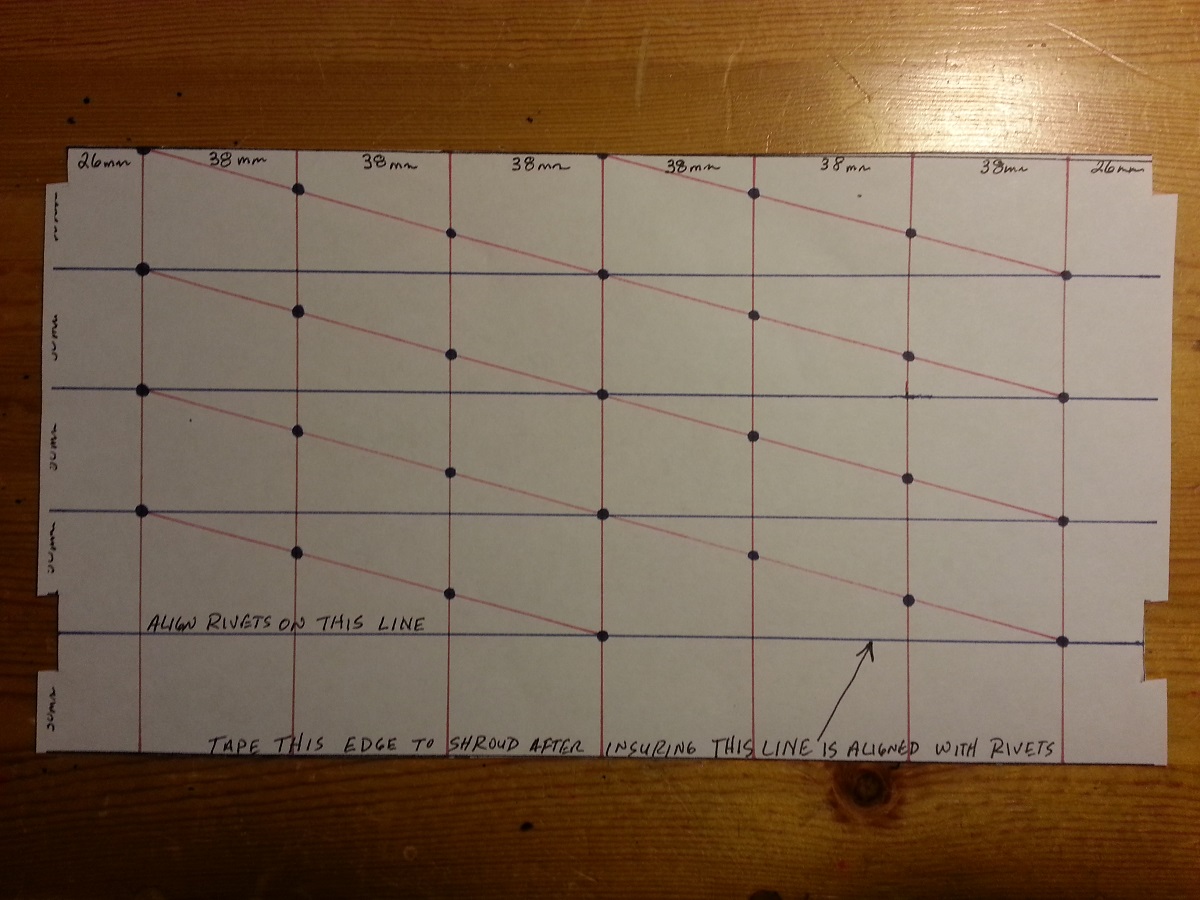
Next I take the template and place it between the rivets on the bottom side of the shroud and lineup the line with the rivets. Now with the line aligned with the rivets, tape down the template. Now, wrap the template around the shroud and the edge of the opposite side should line up on the line you placed between the rivets. Now tape that down and your ready to drill.
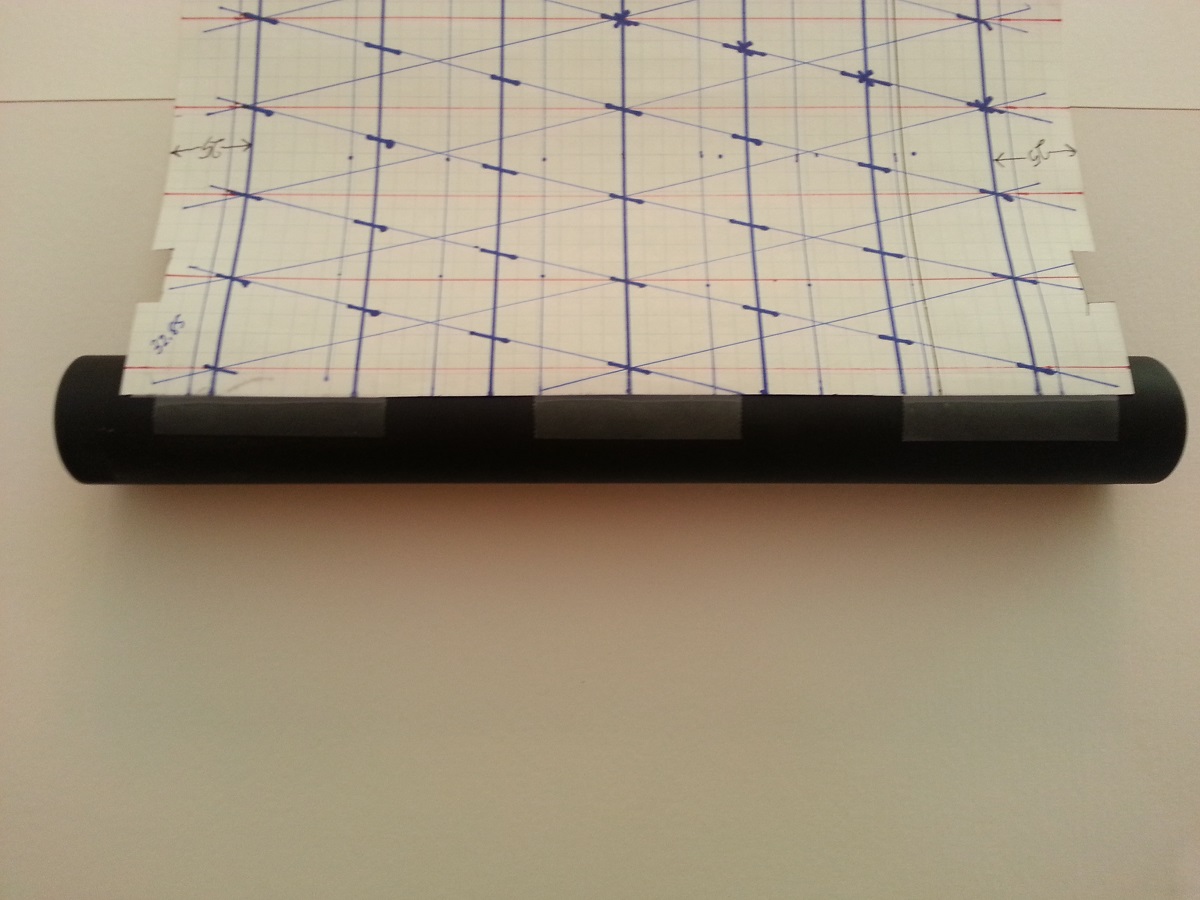
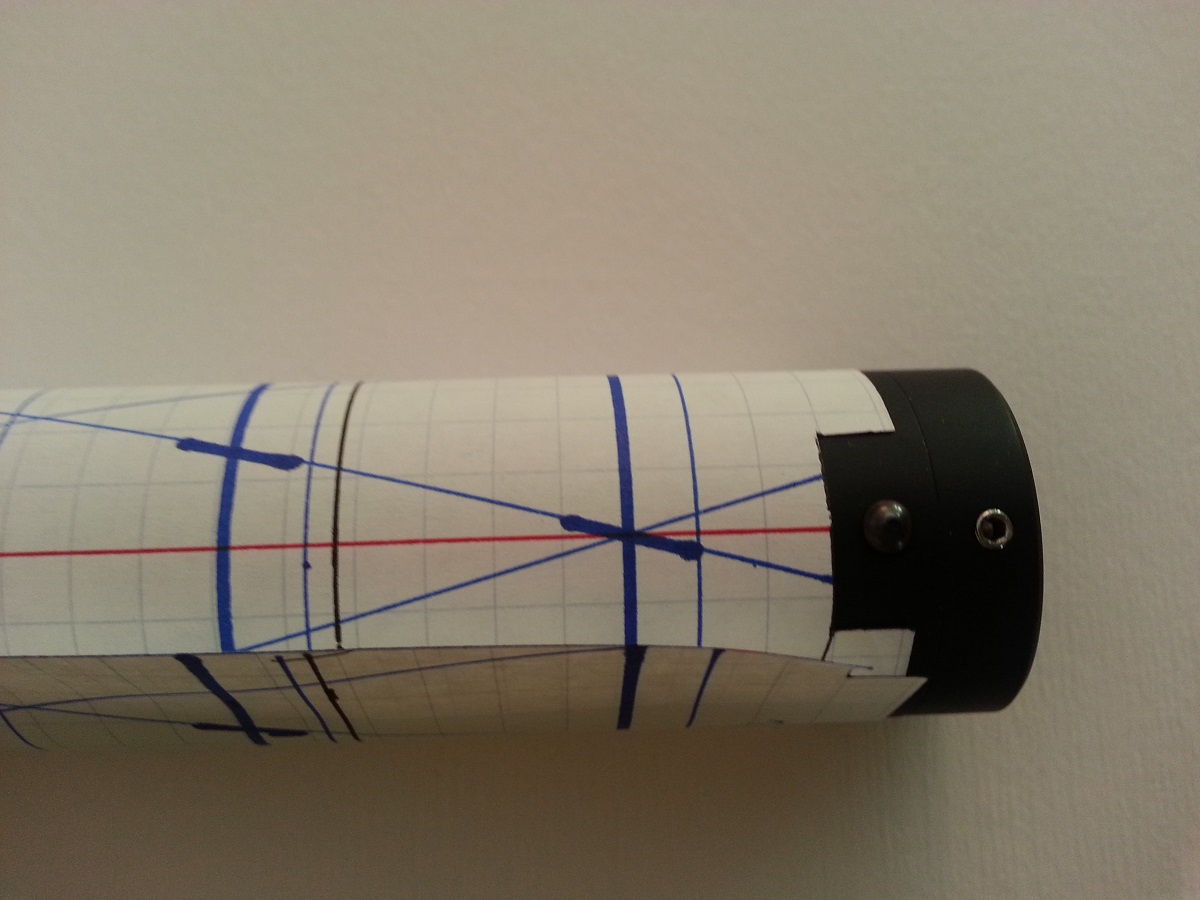

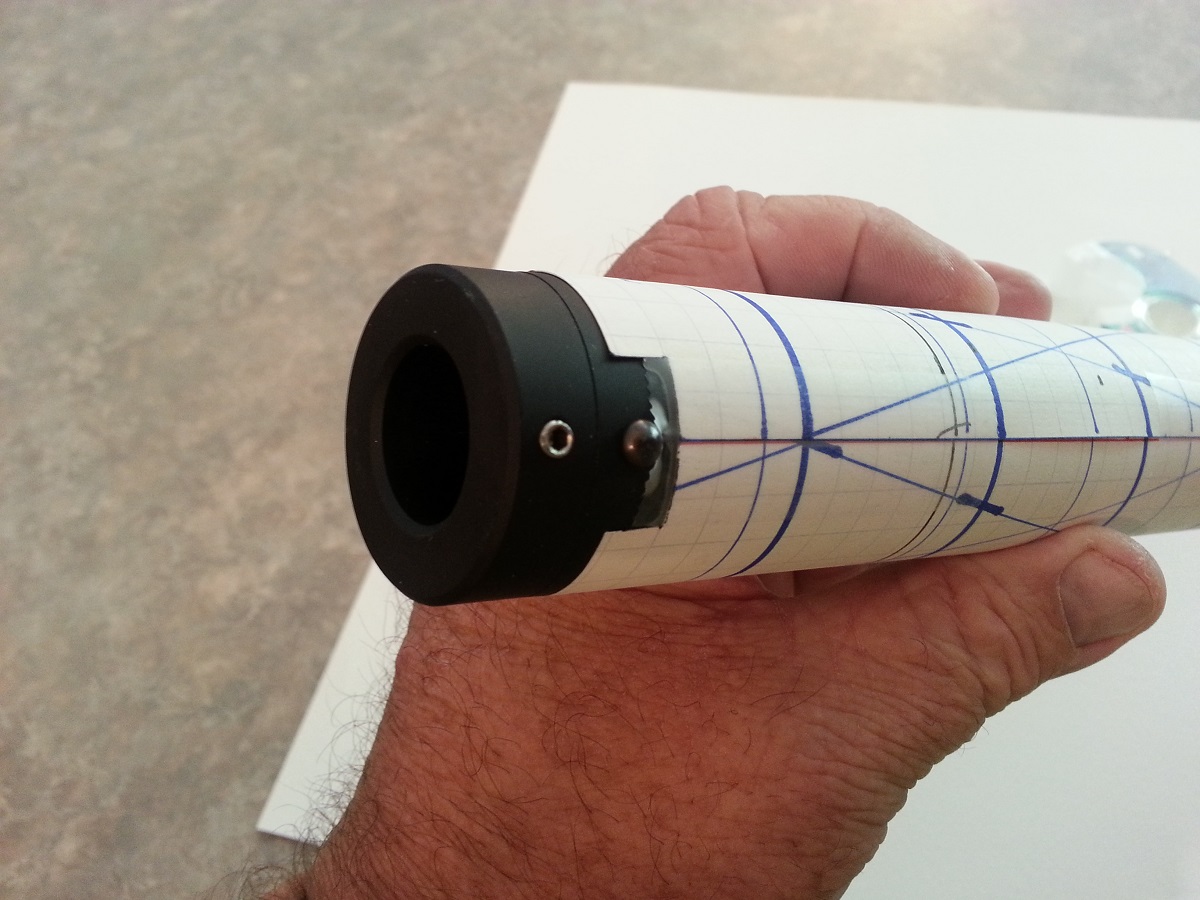
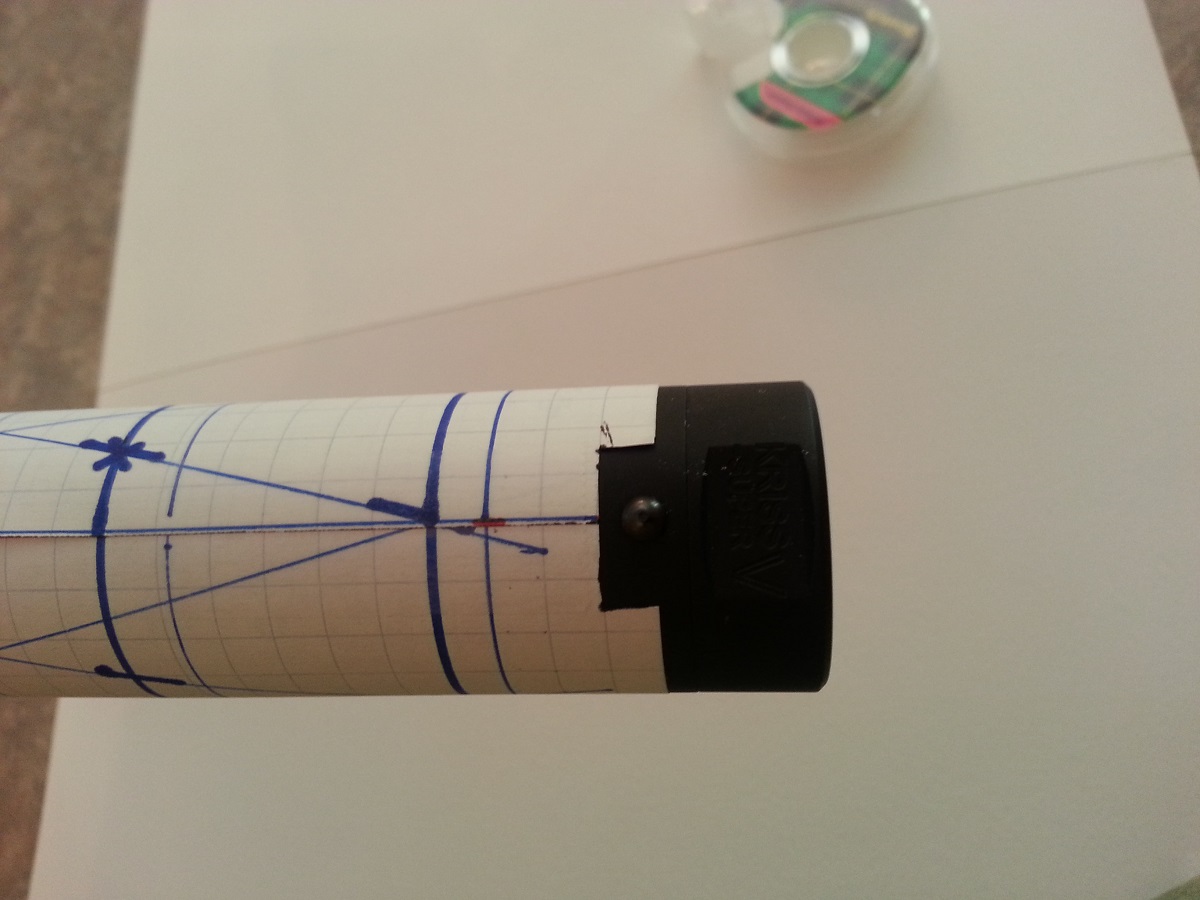
Using the jig that you made, place the shroud in the "V" and align 3/16" drill bit over the intersecting point chosen to drill. Hold end of tube to keep in place while drilling, when done move over to the next point and proceed til all holes are completed. When done, repeat process using the 1/4"-3/4" step bit for your holes. For step bit on drill press, choose the size hole you want for venting. I chose 1/2" and set the depth stop accordingly for the step drill bit. Drilling by hand will take longer but it can be done, just have to be observant to what you're doing.
Once the holes were drilled to proper size I used the debur tool to remove any rough edges or flakes clinging to the edge of the holes. When done deburring the edge around the hole is beveled a little and show a aluminum around the hole, looks kinda neat. You'll have metal flakes inside the tube cling to any crud inside so I turned up the hot water heater to 140 degrees and flushed it out rather than use a degreaser. Advantage with using the very hot water it tends to dry almost immediately.


He's an additional thought for you guys...
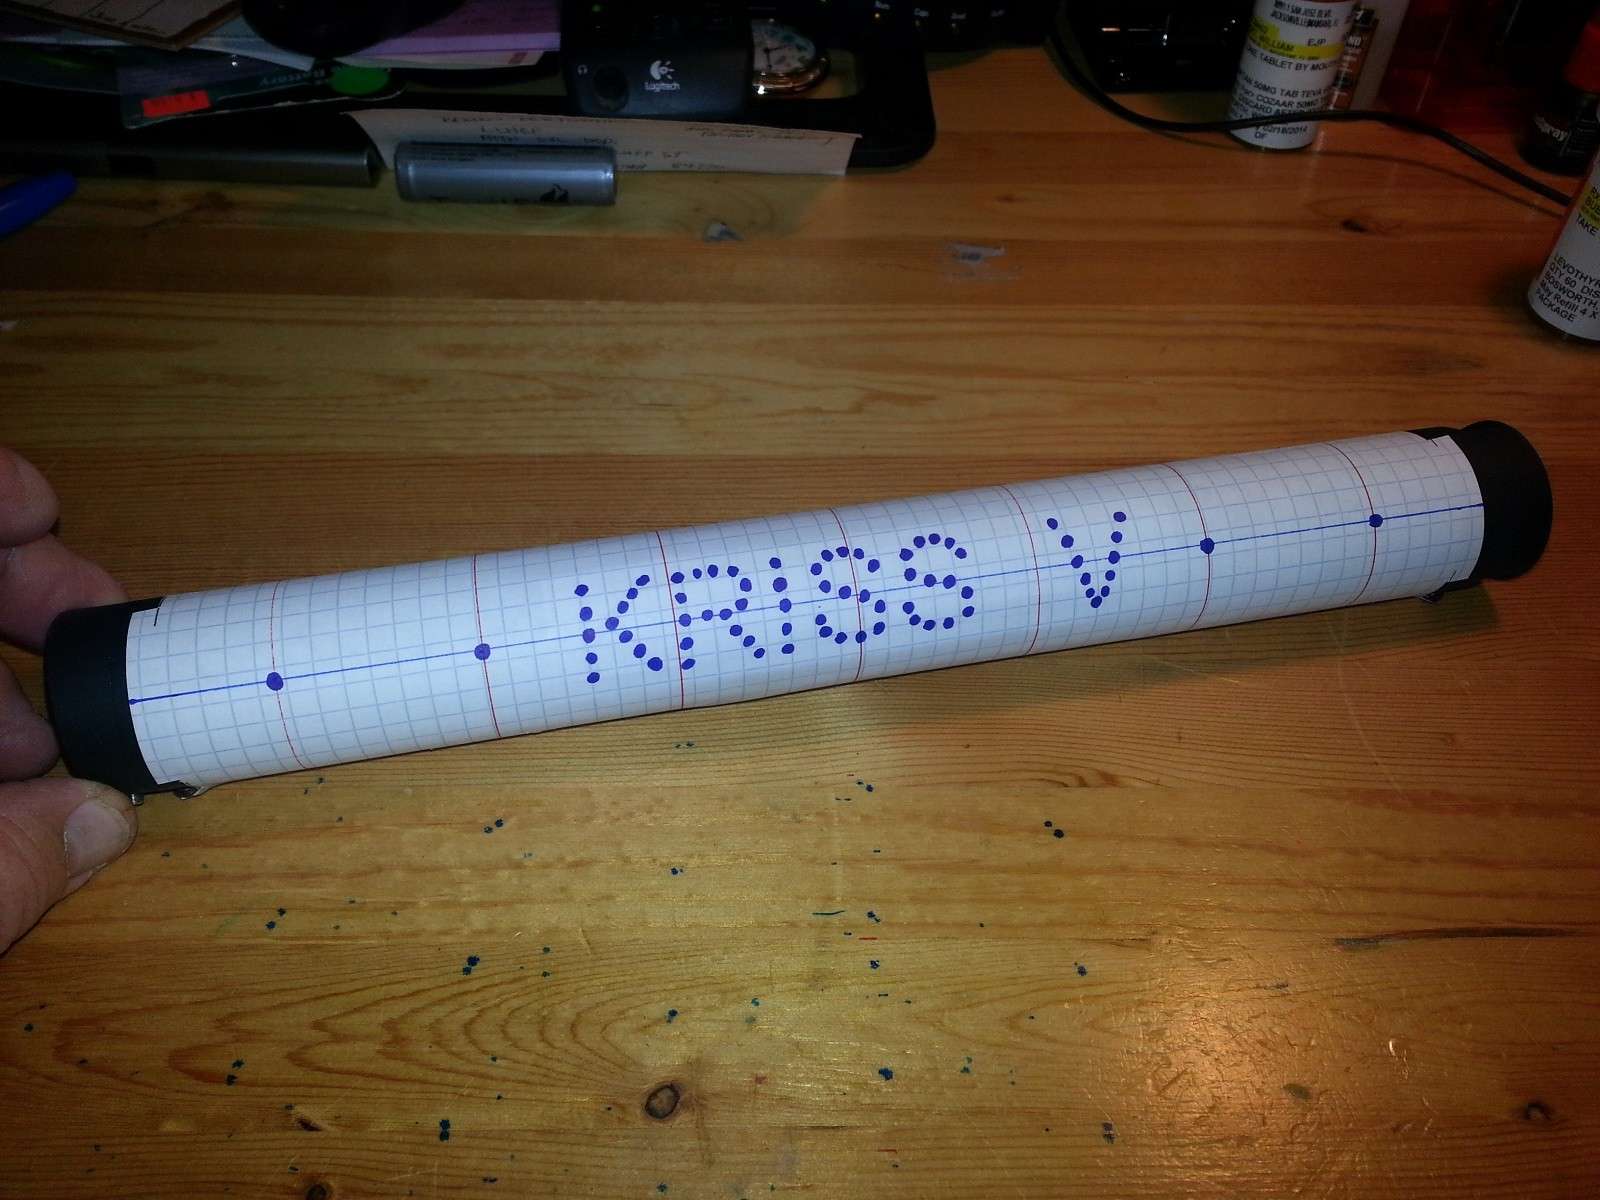
Use the step drill bit to make your vent holes and a 3/32" bit to form the letters.
I can't give you a picture of a finished shroud because mine I is drilled as above.

I will look at having the shroud re-anodized as to protect the metal from weather. I could paint it but, paint tends to be scratched easier, making it look like a P.O.S.. So now I gotta put on my barter hat and try to get it done.
Don't have the guts to do your self, emailed me and we'll see what can be done.
Well that's it for this project, checkout my other's:
- Well, Stipple My Grips
- New Gun Slinger in Town
- Another Brass Catcher
- Kriss Fire Control Group
Well, this will be my fourth thing to post. I hope that they're useful.
Went shooting and as usual the barrel shroud gets hot and stays warm for a while. I'd would like to purchase a vented shroud but, two things stand in my way.
1. The high cost of the shroud.
2. Can't buy something when you got nothing.
So, I'll do then next best thing and hope I don't screw it up. So I thought, do I want a plain Jane straight drilled tube? Nah, why be normal. I decided to do a four rows, seven holes per row and added a spiral turn for effect.
So if your interested, let's get going.
Tools:
- (1) 3/16" drill bit
- (1) 1/4"-3/4" Step drill bit - Harbor Freight Item #44460 - makes a cleaner hole that a large bit does.
- (1) Drill press or (1) Hand drill complete with a steady hand
- (1) Metric ruler. paper and markers
- (1) Debur tool - General Instruments #481 about $9.00 comes in handy for a lot of projects
- Scotch tape
- Jig to hold shroud - Notch a "V" into (2) 2"X4"'s X6" to use as a stand to hold shroud steady while drilling.
OK, my shroud is 120mm in circumference and is 315mm long. I lined out a grid on paper and cut to use as a template to wrap around my shroud. This will give me my locations to drill the holes for venting the shroud.
Next I take the template and place it between the rivets on the bottom side of the shroud and lineup the line with the rivets. Now with the line aligned with the rivets, tape down the template. Now, wrap the template around the shroud and the edge of the opposite side should line up on the line you placed between the rivets. Now tape that down and your ready to drill.
Using the jig that you made, place the shroud in the "V" and align 3/16" drill bit over the intersecting point chosen to drill. Hold end of tube to keep in place while drilling, when done move over to the next point and proceed til all holes are completed. When done, repeat process using the 1/4"-3/4" step bit for your holes. For step bit on drill press, choose the size hole you want for venting. I chose 1/2" and set the depth stop accordingly for the step drill bit. Drilling by hand will take longer but it can be done, just have to be observant to what you're doing.
Once the holes were drilled to proper size I used the debur tool to remove any rough edges or flakes clinging to the edge of the holes. When done deburring the edge around the hole is beveled a little and show a aluminum around the hole, looks kinda neat. You'll have metal flakes inside the tube cling to any crud inside so I turned up the hot water heater to 140 degrees and flushed it out rather than use a degreaser. Advantage with using the very hot water it tends to dry almost immediately.
He's an additional thought for you guys...
Use the step drill bit to make your vent holes and a 3/32" bit to form the letters.
I can't give you a picture of a finished shroud because mine I is drilled as above.
I will look at having the shroud re-anodized as to protect the metal from weather. I could paint it but, paint tends to be scratched easier, making it look like a P.O.S.. So now I gotta put on my barter hat and try to get it done.
Don't have the guts to do your self, emailed me and we'll see what can be done.
Well that's it for this project, checkout my other's:
- Well, Stipple My Grips
- New Gun Slinger in Town
- Another Brass Catcher
- Kriss Fire Control Group
Last edited by RubbaDubbaBubba on Thu Apr 04, 2013 5:09 pm; edited 2 times in total (Reason for editing : Added additional template)
RubbaDubbaBubba- Posts : 9
Join date : 2013-03-15
Age : 34
![]()
![]()

mambro- MOD
- Posts : 617
Join date : 2012-01-08
Location : McKinney, TX
![]()
![]()
Re: Another Shroudy Day **UPDATED 04/04/2013**
![]() by Jedi380 Sun Mar 31, 2013 8:38 am
by Jedi380 Sun Mar 31, 2013 8:38 am
Well Done, and a great write-up! 

Jedi380- Posts : 239
Join date : 2013-01-24
Location : Dayton, OH
![]()
![]()
Re: Another Shroudy Day **UPDATED 04/04/2013**
![]() by AZ2000 Sun Mar 31, 2013 11:24 am
by AZ2000 Sun Mar 31, 2013 11:24 am
Excellent write up and pic's. Thanks 
AZ2000- Posts : 197
Join date : 2012-08-09
Location : AZ
![]()
![]()
Re: Another Shroudy Day **UPDATED 04/04/2013**
![]() by Solscud007 Tue Apr 02, 2013 1:04 am
by Solscud007 Tue Apr 02, 2013 1:04 am
I dig the DIYness!

Solscud007- MOD
- Posts : 1580
Join date : 2012-01-05
Age : 43
Location : Pittsburgh, PA -

![]()
![]()
Re: Another Shroudy Day **UPDATED 04/04/2013**
![]() by CatMostFeared Tue Apr 02, 2013 3:08 am
by CatMostFeared Tue Apr 02, 2013 3:08 am
Excellent Job
CatMostFeared- Admin
- Posts : 799
Join date : 2012-01-05
Age : 55
Location : Kentucky -
![]()
![]()
nih- Posts : 177
Join date : 2012-04-24
![]()
![]()
Re: Another Shroudy Day **UPDATED 04/04/2013**
![]() by MC BEAST Tue Apr 02, 2013 6:22 pm
by MC BEAST Tue Apr 02, 2013 6:22 pm
Outstanding, thanks, now I have something else to add to my want list!
MC BEAST- Posts : 10
Join date : 2012-12-31
Location : Orange Park, FL
![]()
![]()

Xn0r- Posts : 98
Join date : 2012-08-16
Age : 56
Location : Santa Clara, CA (Silicon Valley)
![]()
![]()

P149U3- Posts : 96
Join date : 2013-04-23
Location : Hinesville, GA
![]()
![]()
![]()

 Similar topics
» Flashlight Adapter disappointment
» KRISS Vector Fire Control Group **UPDATED 4-2-13**
» Sig Sauer SB15 Arm Brace On The Kriss Vector SDP Pistol *Updated 9/24/14-Mod Completed*
» ShotShow 2013
» KRISS K10 at SHOT 2013
» KRISS Vector Fire Control Group **UPDATED 4-2-13**
» Sig Sauer SB15 Arm Brace On The Kriss Vector SDP Pistol *Updated 9/24/14-Mod Completed*
» ShotShow 2013
» KRISS K10 at SHOT 2013
Page 1 of 1
Permissions in this forum:
You cannot reply to topics in this forum|
|
|