
 Latest images
Magpul Quick Disconnect Installation
5 posters
Page 1 of 1
![]()
 Magpul Quick Disconnect Installation
![]() by KPV996TT Mon Oct 15, 2012 10:42 pm
by KPV996TT Mon Oct 15, 2012 10:42 pm
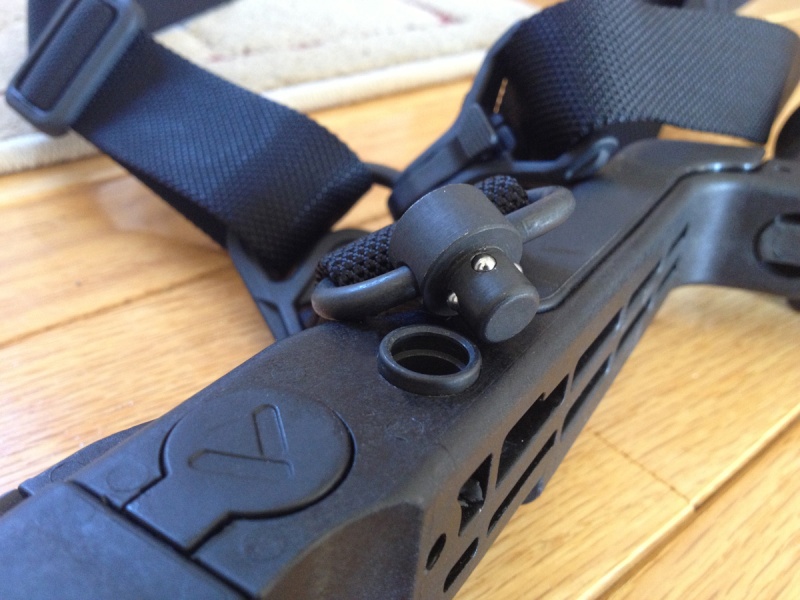
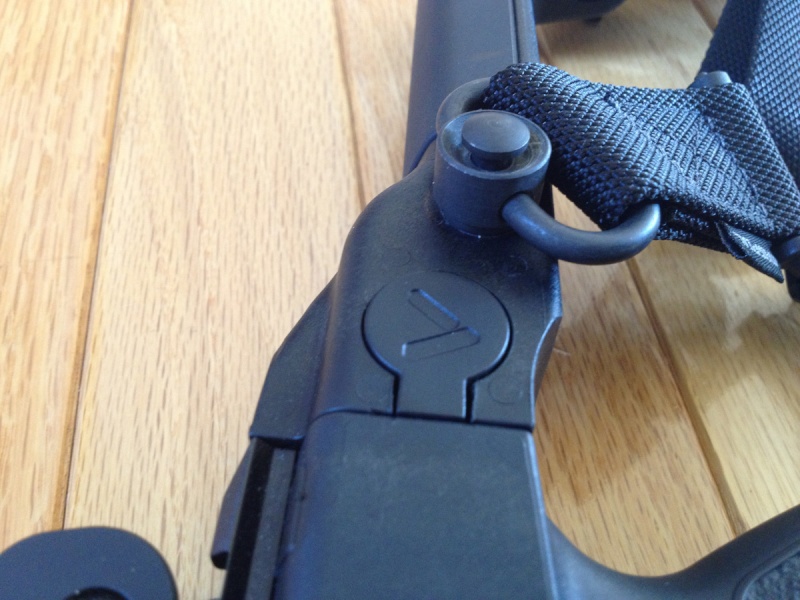
So, I pulled the trigger (literally and figuratively) on the Magpul Quick Disconnect (QD) Sling and receptacle. I recessed the receptacle into the stock of my Vector to make a custom mounting point for the sling.
I thought you guys might want to see it......
I thought you guys might want to see it......
KPV996TT- Posts : 21
Join date : 2012-10-08
![]()
![]()
KPV996TT- Posts : 21
Join date : 2012-10-08
![]()
![]()
Re: Magpul Quick Disconnect Installation
![]() by CatMostFeared Mon Oct 15, 2012 10:51 pm
by CatMostFeared Mon Oct 15, 2012 10:51 pm
Very nice I like it
CatMostFeared- Admin
- Posts : 799
Join date : 2012-01-05
Age : 55
Location : Kentucky -

![]()
![]()
Antrax- Posts : 59
Join date : 2012-06-02
![]()
![]()
Re: Magpul Quick Disconnect Installation
![]() by Solscud007 Tue Oct 16, 2012 8:17 am
by Solscud007 Tue Oct 16, 2012 8:17 am
That is pretty slick!

Solscud007- MOD
- Posts : 1580
Join date : 2012-01-05
Age : 44
Location : Pittsburgh, PA -
![]()
![]()
Re: Magpul Quick Disconnect Installation
![]() by mambro Tue Oct 16, 2012 11:09 am
by mambro Tue Oct 16, 2012 11:09 am
Well done! Details for the next guy that wants to do it?


mambro- MOD
- Posts : 617
Join date : 2012-01-08
Location : McKinney, TX
![]()
![]()
Re: Magpul Quick Disconnect Installation
![]() by Solscud007 Tue Oct 16, 2012 11:16 am
by Solscud007 Tue Oct 16, 2012 11:16 am
It is pretty simple. Drill a hole for the screw all the way thru the stock. Then 1/2"? to the depth you want the QD installed. Shove the QD mount in and screw it from the other side.
The Magpul UBR QD mount is threaded so it is easy to screw it and hold it in place.
The Magpul UBR QD mount is threaded so it is easy to screw it and hold it in place.
Solscud007- MOD
- Posts : 1580
Join date : 2012-01-05
Age : 44
Location : Pittsburgh, PA -
![]()
![]()
Re: Magpul Quick Disconnect Installation
![]() by mambro Tue Oct 16, 2012 11:20 am
by mambro Tue Oct 16, 2012 11:20 am
Sounds good! KPV996TT, can you take a picture of the other side of that stock as well?Solscud007 wrote:...Drill a hole for the screw all the way thru the stock. ...Shove the QD mount in and screw it from the other side...
mambro- MOD
- Posts : 617
Join date : 2012-01-08
Location : McKinney, TX
![]()
![]()
Re: Magpul Quick Disconnect Installation
![]() by Solscud007 Tue Oct 16, 2012 11:24 am
by Solscud007 Tue Oct 16, 2012 11:24 am
If you want to get really fancy, you could countersink the screw.
Solscud007- MOD
- Posts : 1580
Join date : 2012-01-05
Age : 44
Location : Pittsburgh, PA -
![]()
![]()
Re: Magpul Quick Disconnect Installation
![]() by Solscud007 Tue Oct 16, 2012 11:05 pm
by Solscud007 Tue Oct 16, 2012 11:05 pm
I'm curious if the QD sits a little close to your nose? It is further back than mine.
Solscud007- MOD
- Posts : 1580
Join date : 2012-01-05
Age : 44
Location : Pittsburgh, PA -
![]()
![]()
Re: Magpul Quick Disconnect Installation
![]() by Solscud007 Mon Oct 22, 2012 12:44 pm
by Solscud007 Mon Oct 22, 2012 12:44 pm
Here is something interesting someone posted in reference to my QD mod on my SCAR 17.
http://noveskerifleworks.com/cgi-bin/imcart/display.cgi?item_id=fm-qd&cat=165&page=1&search=&since=&status=&title=
Here is my QD mod on my 17.
http://fnforum.net/forums/fn-scar-17s/32611-qd-your-lower-receiver-modification.html
http://noveskerifleworks.com/cgi-bin/imcart/display.cgi?item_id=fm-qd&cat=165&page=1&search=&since=&status=&title=
Here is my QD mod on my 17.
http://fnforum.net/forums/fn-scar-17s/32611-qd-your-lower-receiver-modification.html
Solscud007- MOD
- Posts : 1580
Join date : 2012-01-05
Age : 44
Location : Pittsburgh, PA -
![]()
![]()
Re: Magpul Quick Disconnect Installation
![]() by KPV996TT Tue Oct 23, 2012 10:22 pm
by KPV996TT Tue Oct 23, 2012 10:22 pm
Hey guys,
Sorry I haven't been back since my original post.
Here is a bit more about the installation.....
I chose the location so that there was enough stock material left after the installation process. As you know, the stock is plastic and has stiffening ribs within it. I used a Forstner drill bit in a drill press and proceeded to cut down directly over one of the cross ribs so that its remaining section would act as a stop for the QD sleeve. The Forstner bit has a small pilot tip and a flat bottom for the main hole. This is in contrast to a beveled hole bottom using a regular drill bit. The pilot tip provided a center point alignment for a smaller drill bit to drill the center hole through to the other side of the stock. I thought about countersinking the screw, however, with the depth of the receptacle and the remaining thickness of the stock, I preferred to surface mount the button head hex screw. Countersinking would have removed too much stock material in my opinion.
THe receptacle was then pressed into place with a little bit of epoxy for good measure. It isn't going anywhere! LOL
As for the location of the QD. I would have preferred a more forward location, however, I wanted to leave the pushbutton area intact and, as mentioned above, I wanted to take into account a strong position in the stock considering its rib layout.
I absolutely love this! I think Kriss should consider adding this QD receptacle on future models.
Cheers!
KPV996TT- Posts : 21
Join date : 2012-10-08
![]()
![]()
Re: Magpul Quick Disconnect Installation
![]() by CatMostFeared Wed Oct 24, 2012 8:04 am
by CatMostFeared Wed Oct 24, 2012 8:04 am
My stuff should be in the mail today and I'm going to do the same thing
CatMostFeared- Admin
- Posts : 799
Join date : 2012-01-05
Age : 55
Location : Kentucky -
![]()
![]()
![]()

 Similar topics
» Installation of E1B Light
» Sig Sauer SB15 Arm Brace On The Kriss Vector SDP Pistol *Updated 9/24/14-Mod Completed*
» quick detach or fixed sling mount pin
» Needed: kriss Flashlight installation instruction
» magpul ms3 sling
» Sig Sauer SB15 Arm Brace On The Kriss Vector SDP Pistol *Updated 9/24/14-Mod Completed*
» quick detach or fixed sling mount pin
» Needed: kriss Flashlight installation instruction
» magpul ms3 sling
Page 1 of 1
Permissions in this forum:
You cannot reply to topics in this forum|
|
|